
What Is Gravity Forms?
Gravity Forms is a powerful form plugin for WordPress that allows you to create and customise useful forms with ease. Whether you need a simple contact form or a complex multi-page form, Gravity Forms has got you covered.
With its array of styling options and customisation settings, you can easily tailor your forms to match your brand’s unique look and feel. From changing background colours to styling form fields, radio buttons, and dropdown menus, Gravity Forms provides you with the flexibility to design and personalise every aspect of your forms. The plugin also offers ready classes and built-in block styling options, making it even easier to create beautiful designs without the need for custom CSS code.
Whether you’re a beginner or an experienced WordPress user, Gravity Forms is the go-to solution for creating powerful and stunning forms for your website.
Why use Gravity Forms?
Gravity Forms is a powerful contact form plugin for WordPress websites that offers numerous benefits for users. One of the main advantages of using Gravity Forms is its user-friendly drag and drop interface, which makes it incredibly easy to build custom forms without any coding knowledge. This intuitive UI sets Gravity Forms apart from other form plugins in the market.
In addition to its simple form building capabilities, Gravity Forms also offers a range of popular features. Multi-column layouts allow users to create visually appealing forms that capture information efficiently. Field validation ensures that users input the correct data, reducing errors and improving data quality. Gravity Forms also supports file uploads, allowing users to collect files and attachments from their form submissions.
By using Gravity Forms, website owners can streamline communication with customers and improve their overall user experience. The plugin’s flexibility and customisation options make it ideal for creating forms tailored to specific needs as part of engaging with website visitors and capturing business critical information.
Styling Your Forms
When it comes to creating stunning and professional-looking forms, Gravity Forms offers a wide range of styling options that can elevate the design and functionality of your website. With just a few clicks, you can customise the appearance of your forms to integrate with your brand, providing a cohesive and visually appealing user experience.
One of the standout features of Gravity Forms is the range of CSS ready classes, which are predefined CSS classes that can be added to your form elements. These ready classes offer quick and easy styling options, saving you time and effort. Whether you want to add borders, change the colour of radio buttons, or adjust the border radius of input fields, the ready classes make it simple to achieve the desired look.
For those with more advanced design skills, Gravity Forms offers the option to add custom CSS code directly to your forms. This allows you to have complete control over every element, from tweaking the font styles to adjusting the spacing and alignment. With custom CSS, the possibilities are endless, and you can create truly unique and beautiful designs.
In addition to the visual aspects, Gravity Forms also allows you to customise the messages that appear when users encounter errors or successfully submit the form. You can personalise these messages to fit your brand’s tone and even add styling to make them stand out. This attention to detail enhances the overall user experience and adds a professional touch to your forms.
Gravity Forms is also designed with responsiveness in mind, ensuring that your forms look great on any device, from desktop computers to mobile phones. With its responsive design, your forms will automatically adjust their layout and styling to provide a seamless and user-friendly experience on any screen size.
Whether you’re a beginner or an experienced designer, Gravity Forms provides the tools and flexibility to create powerful forms that not only look great but also enhance your website’s functionality. With its extensive styling options, custom CSS capabilities, and responsive design, Gravity Forms is the go-to plugin for creating stunning and engaging forms that leave a lasting impression.
1. General Form Styling Options
At a base level when it comes to form styles, Gravity Forms provides a variety of options and styling options for form elements. Users can customise the location of form titles, form descriptions, and form field labels. This level of customisation ensures that the forms align with your brand’s voice and messaging, enhancing the overall user experience as shown below.
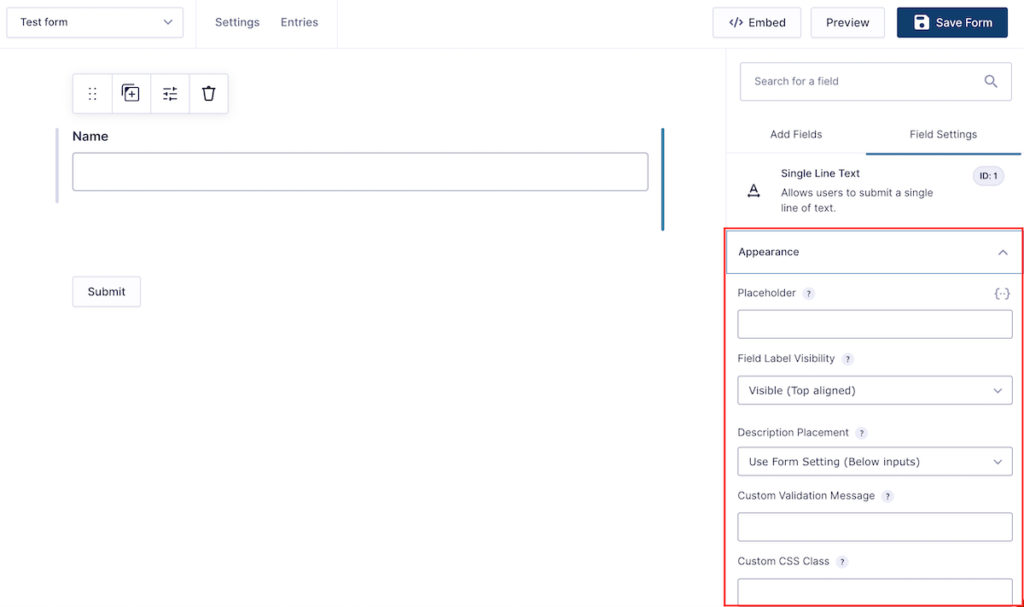
To further customise forms, you would need some of the other options listed below such as editing the CSS variables provided by Gravity Forms. This would allow users with advanced design skills to have complete control over every element of the form, including font styles, spacing, and alignment. By leveraging CSS variables, users can create unique and beautiful designs that perfectly suit their needs. We discuss this more below.
2. Adding CSS Ready Classes to Form Elements
Gravity Forms provides an easy way to modify the styles of form elements by adding CSS ready classes. Adding these classes to form elements allows you to customise the appearance of a form without having to write code from scratch.
To add classes to form elements in Gravity Forms, follow these simple steps:
- Open the Gravity Forms editor and navigate to the field settings of the form element you want to modify.
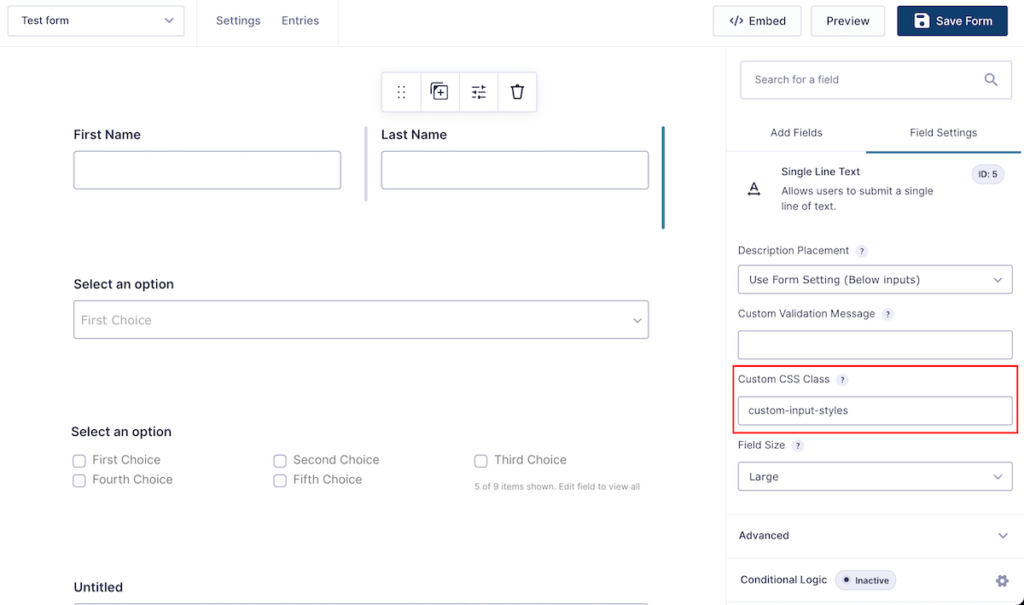
- In the Appearance tab, you will find the “Custom CSS Class” field. This is where you can enter the relevant class for the form element.
- Enter the desired class name in the Custom CSS Class field. You can add multiple classes by separating them with a space.
For example, if you have a large list of checkbox items in your form you can split them into multiple columns by using the “gf_list_3col” Custom CSS Class, this converts a basic set of fields into 3 equal columns.
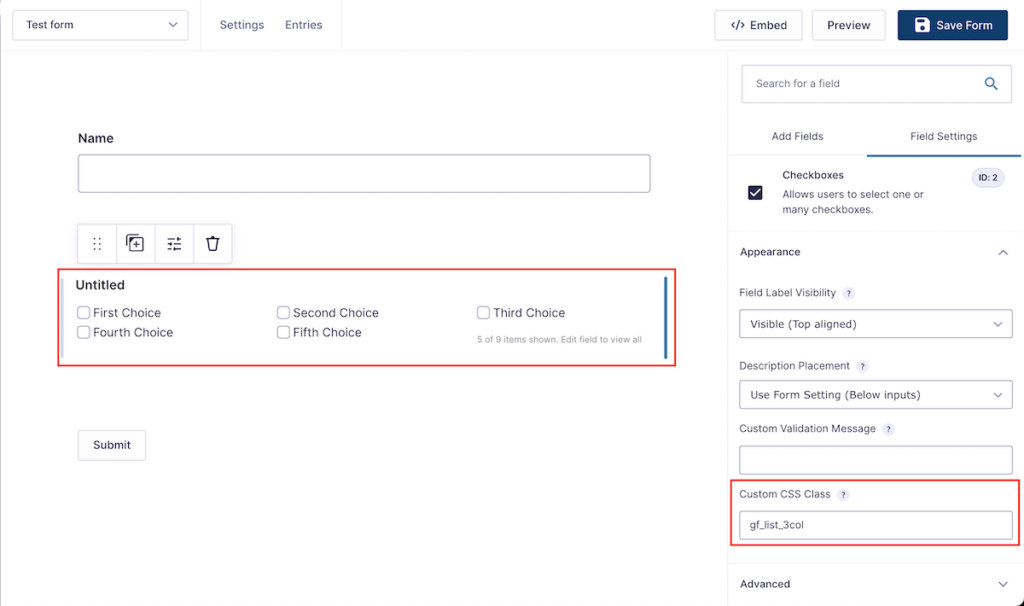
By adding classes to form elements in Gravity Forms, users have the freedom to customize the styles according to their preferences, without the need for extensive CSS coding. This feature provides a convenient way to achieve the desired visual appearance for your forms.
3. Using CSS Files to Style Your Forms
An even more advanced way to customise your forms is to style your forms using CSS. There are several ways to do this, for example, in the follow these steps:
- Write your custom CSS code: Open a code editor and start writing your custom CSS code to style the forms. You can target specific form elements by using their class names. For example, if you want to target the form title, you can use the class “.gform_title” in your CSS code.
- Paste the custom CSS into your WordPress custom CSS field usually found at Appearance > Customise > Additional CSS
- Continue to add mroe CSS and reference existing Gravity Forms classes: As you write your custom CSS code in the CSS file, you can reference the classes used by Gravity Forms. The plugin generates classes for each form element, making it easy to target them with your CSS code. As another example, if you want to modify the submit form button, you can use the class “.gform_wrapper .gform_button”.
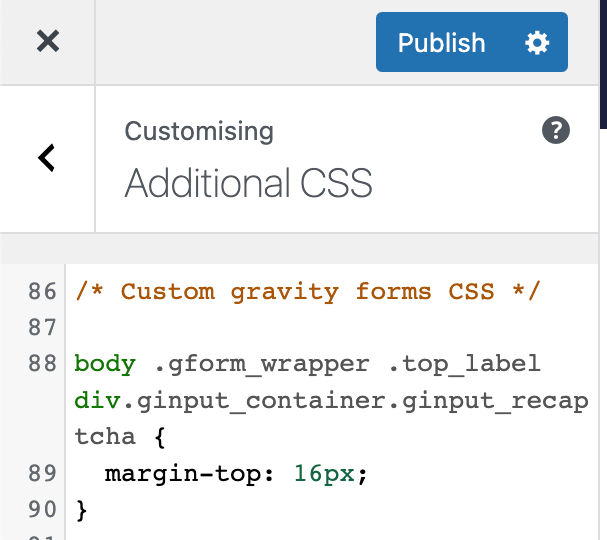
You can even use this feature when you have a single form with multiple pages which each have variations in styles using the page classes. Each page will have a class such as “body #gform_wrapper_1 #gform_page_1_2” which targets page 2 in form ID 1.
The result will be beautifully styled forms that match your website’s design.
4. Setting a Border Radius on Form Elements
To set a border radius on form elements in Gravity Forms using the Form Editor, follow these simple steps. The border radius allows users to customise the appearance of individual form fields, giving them a unique and stylish look using custom CSS options.
- Open the Form Editor: Start by navigating to the Gravity Forms plugin on your WordPress dashboard. Select the form that you want to customise, and click on the “Form Editor” button.
- Select the form element: In the Form Editor, locate the form element that you want to style. This can be an input field, radio button, dropdown menu, or any other form element.
- Access the styling options: With the form element selected, go to the “Field Settings” tab. Here, you will find various customisation options for the selected element including appearance.
- Set the border radius using a custom CSS class, under your WordPress theme’s CSS file or built-in “Customiser” (discussed earlier)
- Preview and save: Once you are satisfied with the appearance, click on the “Update” or “Save Form” button to apply the changes.
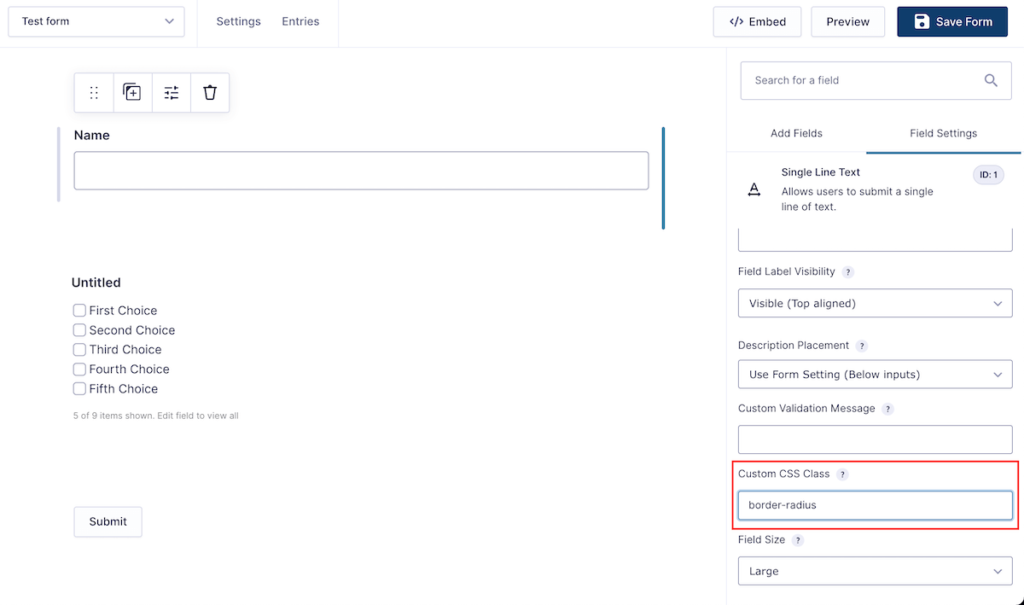
The custom CSS you want to use will depend on the form field but a healthy starting point should be something like:
input {
    border-radius: 0.5rem;
}
By setting a border radius on form elements or even the form wrapper within Gravity Forms, you can enhance the aesthetics of your forms and make them match your website’s design. Take advantage of the customisation options provided by the Form Editor to create visually appealing and engaging forms that capture your users’ attention.
5. Styling Radio Buttons and Other Inputs
Styling radio buttons and other inputs in Gravity Forms using CSS allows you to customise the appearance of these specific form elements and create a more visually appealing form. To achieve this, follow these steps:
- Open the Form Editor: Login to your WordPress dashboard and navigate to the Gravity Forms plugin. Choose the form you want to style and click on the “Form Editor” button.
- Select the Form Element: Identify the radio button or input field you wish to modify within the Form Editor. Click on it to select.
- Access the CSS Customization: In the “Field Settings” tab, scroll down to the “Custom CSS Class” option under Appearance. Add a new class name, for example for styling new radio options use “custom-radio”.
- Add CSS Code: Go to your WordPress theme’s CSS file or the built-in “Customiser” (discussed earlier). Insert the following CSS code snippet:
.custom-radio input[type="radio"],
.custom-radio input[type="checkbox"] {
    display: none;
}

.custom-radio label {
    display: inline-block;
    padding: 8px 16px;
    background-color: #ffffff;
    border: 1px solid #dddddd;
    border-radius: 4px;
    cursor: pointer;
}- Transform Checkbox inputs into Buttons: To make checkboxes resemble buttons, use this CSS code snippet:
.custom-radio input[type="checkbox"] + label {
    border-radius: 20px;
    /* and additional styling as needed */
}- Save: Click the “Update” or “Save Form” button to apply the customised styles.
By following these steps and incorporating the provided CSS code snippets, you can easily customise and transform radio buttons and checkboxes into buttons with stunning visual effects in your Gravity Forms. Take advantage of CSS to ensure your form stands out and matches your website’s design seamlessly.
6. Creating Dropdown Menus for Selections
Creating Dropdown Menus for Selections in Gravity Forms
Dropdown menus are a valuable tool in Gravity Forms, allowing you to present users with a list of choices to select from. Follow these step-by-step instructions to add a dropdown field to your form and customise its options:
- Open the Form Editor: Log in to your WordPress dashboard and navigate to the Gravity Forms plugin. Select the form you want to add the dropdown menu to and click on the “Form Editor” button.
- Add a Dropdown Field: Within the Form Editor, drag and drop a “Dropdown” field from the available form fields on the right-hand side.
- Customise Field Options: With the dropdown field selected, you can modify its properties in the “Field Options” tab. Add your options one by one, with each option on a new line.
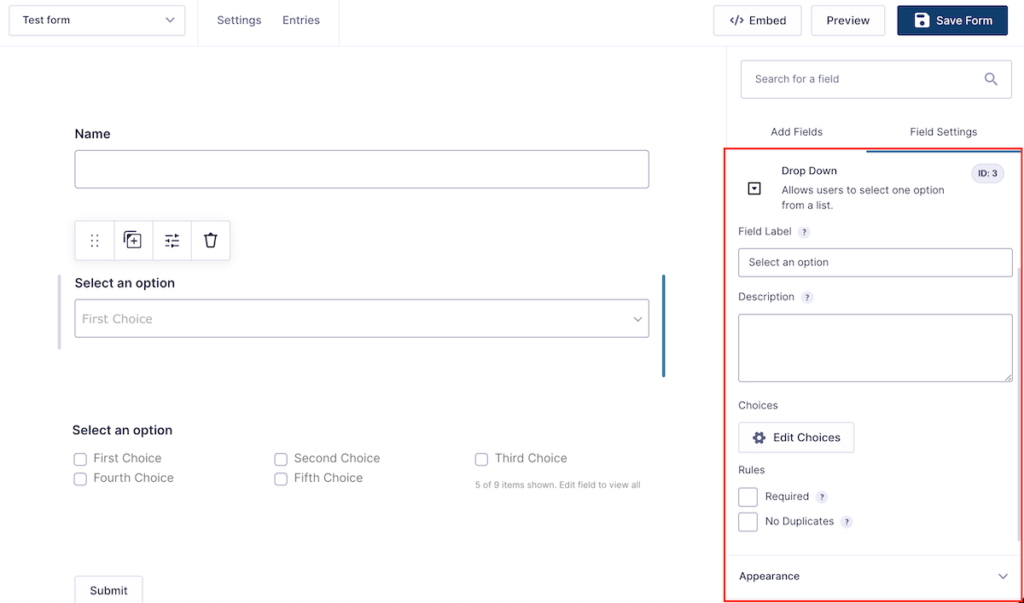
- Choose the Default Value: If you want to pre-select a default option in the dropdown menu, specify it in the “Default Value” field.
- Configure Conditional Logic (Optional): If you want the visibility of the dropdown field to depend on other user selections or to have a custom confirmation message or validation message, you can apply conditional logic in the “Conditional Logic” section of the field editor.
- Preview and Save: To see how the dropdown menu will look, click on the “Preview” button within the Form Editor to ensure there are no error messages. If you’re satisfied with the changes, click “Update” or “Save Form” to apply them.
By following these simple steps, you can easily create dropdown menus for selections in Gravity Forms. Customising the options allows you to provide your users with an array of choices, making your forms more interactive and user-friendly.
7. Adding a Background Colour to a Form Field
To add a background colour to your form in Gravity Forms, you can utilise custom CSS and update the HEX colour value. Here’s how you can do it in a few simple steps:
- Open the Form Editor: Log in to your WordPress dashboard and navigate to the Gravity Forms plugin. Select the form you want to add the background colour to and click on the “Form Editor” button.
- Add a CSS Class: Within the Form Editor, select the form element where you want to add the background colour. In the field options, find the “Custom CSS Class” setting and enter a unique class name. For example, you can use “bg-colour” as the class name.
- Add Custom CSS: In your WordPress dashboard, go to Appearance > Customise. Then, navigate to the “Additional CSS” section. Here, you can add the CSS code to style your form. To change the background colour, use the following code (Replace “FF0000” with the desired colour’s HEX code. For example, #f2f2f2 is a light gray):
.bg-color {
    background-color: #FF0000;
}- Update and Save: Once you’ve added the custom CSS code, click on the “Update” or “Save Form” button in the Form Editor to apply the changes.
Remember, if you want to change the background image instead of the colour, you’ll need to upload the image to your WordPress media library. After uploading the image, copy its URL and update the CSS code accordingly by modifying the background property to:
.bg-color {
    background-image: url('PATH_TO_IMAGE');
}
Replace “PATH_TO_IMAGE” with the URL of the uploaded image.
By following these steps and using custom CSS, you can easily add a background colour or image to your Gravity Forms and customise their appearance.
8. Making a Responsive Design for Mobile Devices
Creating a responsive design for mobile devices using Gravity Forms is essential to ensure that your embedded form widget will resise and adapt seamlessly to different screen sizes. With the increasing number of users accessing websites on their mobile devices, it is crucial to provide a user-friendly experience.
Gravity Forms allows you to easily customise the layout of your forms, making it convenient to create responsive designs. One effective method is to use a column layout on your forms by dragging elements beside each other in the drag and drop form block editor.
For example, dragging a field beside an existing field in the form causes there to be two columns of “50%” size. This will ensure that the form element takes up half of the available width on any screen.
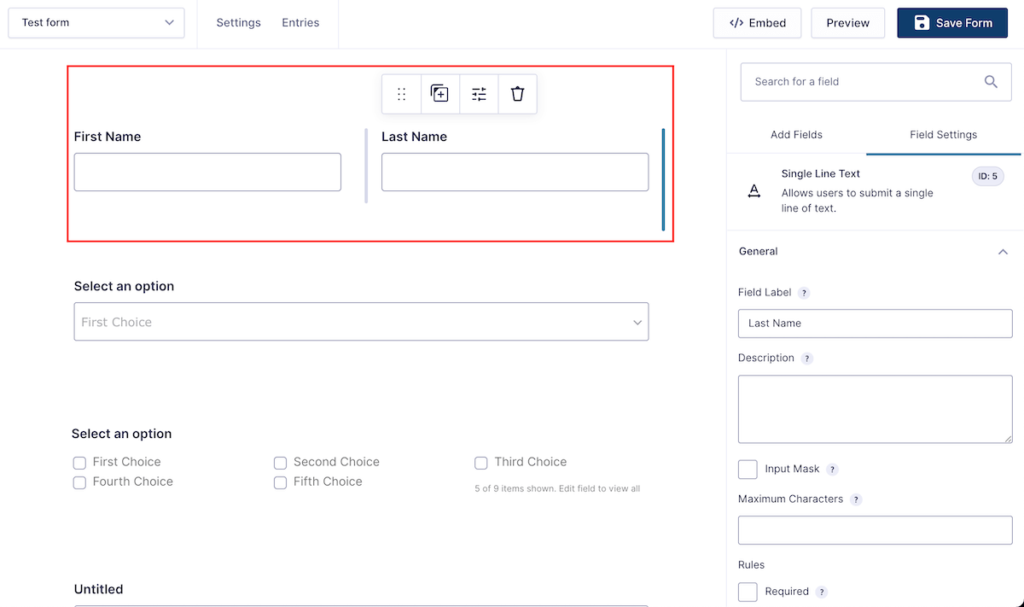
By doing this with your form elements, you can create a fluid layout that adapts to the screen size of mobile devices. This allows users to easily fill out your forms without the need for horizontal scrolling or zooming.
Don’t forget to thoroughly test your forms on different mobile devices to ensure that they appear and function correctly. By prioritising responsive design, you can provide a seamless user experience to all visitors, regardless of the device they use.
9. Adding Gravity Forms Styles to WordPress Child Themes
For a cleaner code setup you can add your custom code to your child theme. Follow these step-by-step instructions to add Gravity Forms styles to your WordPress child theme:
- Create a Child Theme: If you haven’t already, create a child theme for your WordPress website. This ensures that any changes made to the parent theme won’t be overwritten during updates. Discover more about how to do this in our handy guide about child themes.
- Locate the CSS File: In your child theme’s directory on the server, navigate to the folder containing the CSS files. Usually, this is the ‘style.css’ file in ‘/wp-content/themes/your-child-theme-name/’.
- Add Custom CSS Code: Open the ‘style.css’ file and add your custom CSS code to modify the appearance of your forms. You can target specific form elements, such as input fields, radio buttons, dropdown menus, etc., by using their CSS class or ID selectors. Make sure to save the changes.
By following these steps and utilising custom CSS code in your WordPress child theme, you can easily modify the appearance of your Gravity Forms while ensuring that any updates to the parent theme won’t override your customisations.
10. Adding Final Visual Details to Make Your Forms Unique
When it comes to creating forms on your WordPress website, adding final visual details can make a significant difference in making your forms unique and visually appealing. These details go beyond the basic form setup and allow you to customise various elements to align with your brand and enhance the user experience.
One way to add a personal touch is through custom HTML placement. By incorporating HTML elements such as your company logo within the form, you create brand consistency and familiarity for your users. This can be achieved by using the built-in HTML element in the Gravity Forms block editor builder. Simply upload your logo and position it strategically to match your desired layout using HTML snippets.
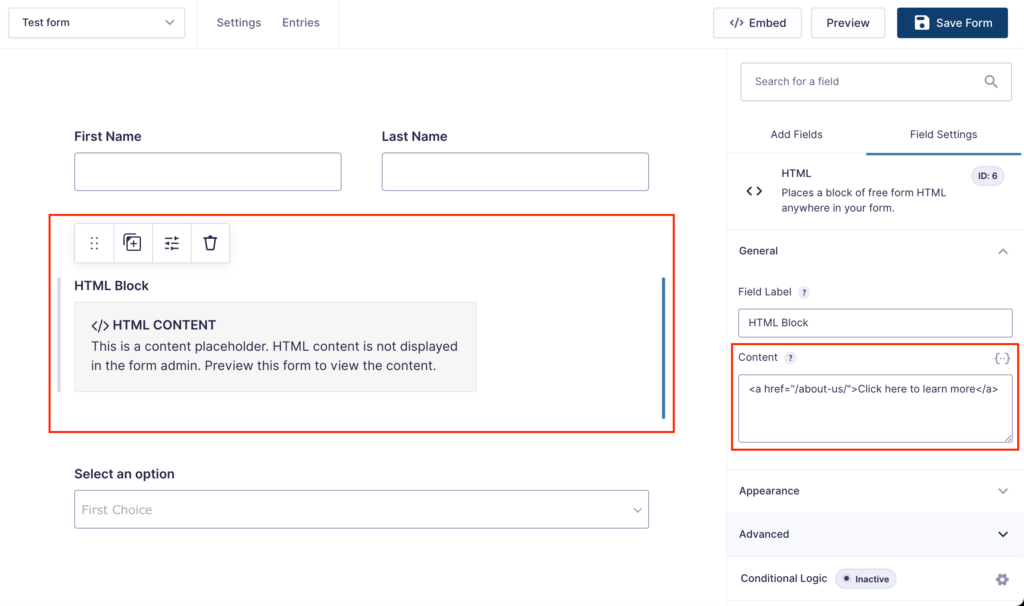
By focusing on these final visual details, you can create a visually appealing and user-friendly experience for your form users. A well-designed form with custom logo placement, attractive form field appearance, and other advanced customisation options not only enhances the overall aesthetic but also instills a sense of professionalism and trust in your audience. This attention to detail can lead to increased form submissions and a better user engagement.
How to get help with your Gravity Forms Styles?
If you need help with customising and styling your Gravity Forms, there are several resources available to assist you.
Firstly, WP Runner offers expert WordPress developers who can fully customise and style your form in advanced ways. With their expertise, you can create beautifully designed forms that match your website’s overall aesthetic. You can learn more about how we can do this, Gravity Forms work for you on our sign up page.
If you prefer to dig into the technical details you can find comprehensive documentation on the Gravity Forms website. This documentation provides step-by-step instructions and explanations on how to modify various form elements and styles. It covers everything from basic form styling to more advanced customisation options.
Additionally, there are tutorials available online that walk you through specific styling techniques for Gravity Forms. These tutorials can be found on various platforms, including YouTube and popular WordPress blogs (like this blog!). They provide valuable insights and tips to help you achieve the desired look for your forms.
If you have specific questions or need further assistance, you can turn to the Gravity Forms support forums. These forums are a great place to interact with other users who may have faced similar challenges or have expertise in form styling. The community is usually friendly and helpful, and you can find answers to your queries or even ask for guidance from experienced users or the Gravity Forms support team.
By utilising these resources, you can get the help you need to fully customise and style your Gravity Forms to create visually appealing and user-friendly forms that align with your website’s design.